|
ESP8266驱动I2C
简介
本指南演示如何使用使用 Arduino IDE 将 0.96 英寸 SSD1306 OLED 显示屏与 ESP8266 一起使用。我们将向您展示如何编写文本、设置不同的字体、绘制形状和显示位图图像。
我们将在本教程中使用的 OLED显示屏是 SSD1306 型号:单色 0.96 英寸显示屏,像素为 128×64 像素,如下图所示。
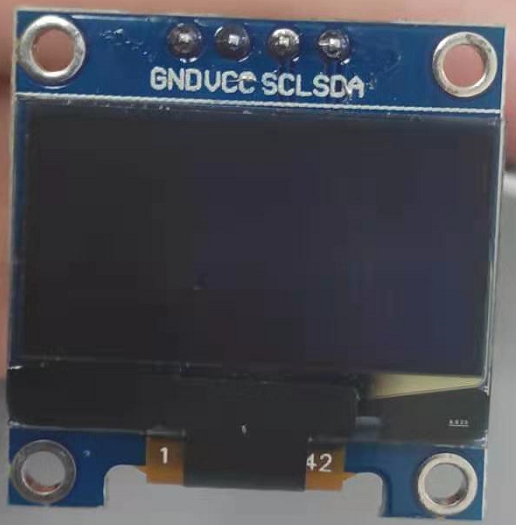
OLED 显示屏不需要背光,在黑暗环境中会形成非常好的对比度。此外,其像素仅在打开时消耗能量,因此 OLED 显示屏与其他显示器相比消耗的电量更少。
我们使用的模型有四个引脚,并使用 I2C 通信协议与任何微控制器通信。有些型号还配有额外的 RESET 引脚或使用 SPI 通信协议进行通信。
接线图
由于 OLED 显示屏使用 I2C 通信协议,因此布线非常简单。您可以使用下表作为参考。
针
ESP8266
Vin
3.3V
Gnd
Gnd
Scl
GPIO 5(D1)
Sda
GPIO 4(D2)
或者,您可以按照下一个示意图将 ESP8266 连接到 OLED 显示屏。
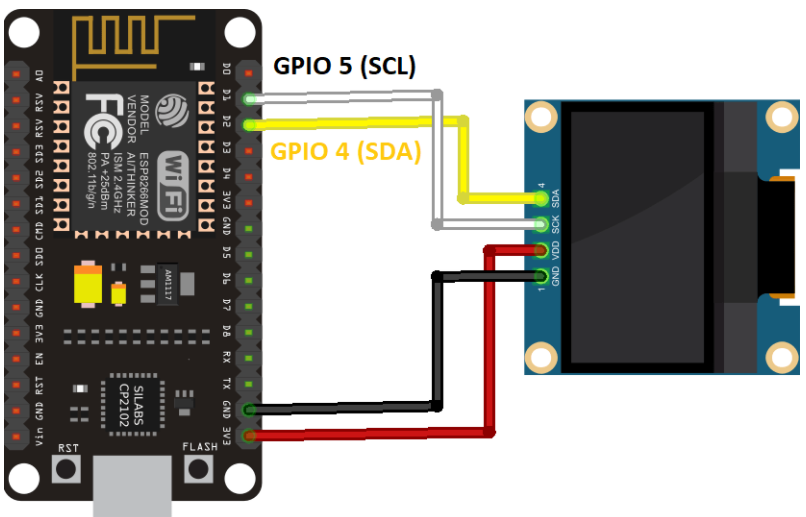
在此示例中,我们使用的是 I2C 通信协议。ESP8266 中最适合 I2C 通信的引脚是GPIO 5(SCL) 和GPIO 4(SDA)。
如果您使用的 OLED 显示屏具有 SPI 通信协议,请使用以下 GPIOs。
GPIO 14: CLK
GPIO 12: MISO
GPIO 13: MOSI
GPIO 15: CS
安装 SSD1306 OLED 库 + ESP8266
打开您的 Arduino IDE,转到工具 -> 管理库。库管理器应打开。
在搜索框中键入 [SSD1306],然后从 Adafruit 安装 SSD1306 库。
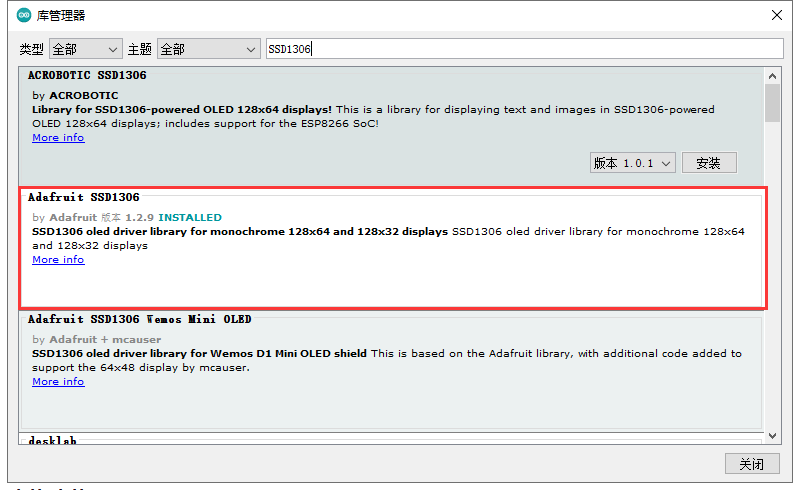
从 Adafruit 安装 SSD1306 库后,在搜索框中键入"GFX"并安装库。
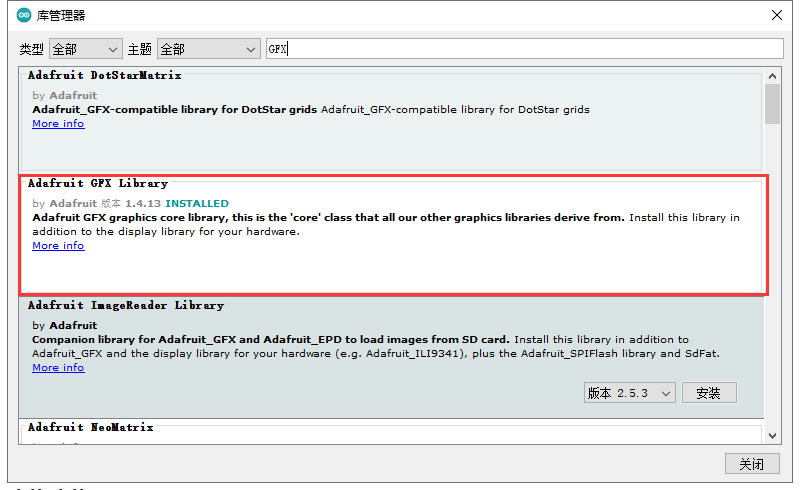
安装库后,重新启动 Arduino IDE。
使用 ESP8266 测试 OLED 显示屏
将 OLED 显示屏连接到 ESP8266 并安装所有必需的库后,可以使用库中的一个示例查看一切是否正常工作。
在 Arduino IDE 中,转到文件>示例> Adafruit SSD1306,然后选择您正在使用的显示器的示例。
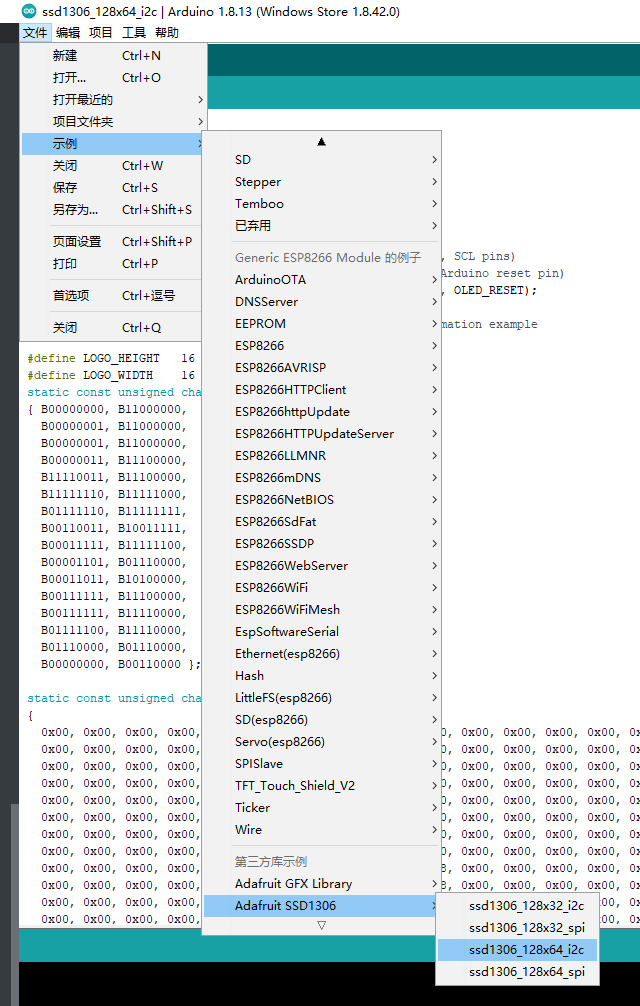
/**************************************************************************
This is an example for our Monochrome OLEDs based on SSD1306 drivers
Pick one up today in the adafruit shop!
------> http://www.adafruit.com/category/63_98
This example is for a 128x32 pixel display using I2C to communicate
3 pins are required to interface (two I2C and one reset).
Adafruit invests time and resources providing this open
source code, please support Adafruit and open-source
hardware by purchasing products from Adafruit!
Written by Limor Fried/Ladyada for Adafruit Industries,
with contributions from the open source community.
BSD license, check license.txt for more information
All text above, and the splash screen below must be
included in any redistribution.
**************************************************************************/
#include
#include
#include
#include
#define SCREEN_WIDTH 128 // OLED display width, in pixels
#define SCREEN_HEIGHT 64 // OLED display height, in pixels
// Declaration for an SSD1306 display connected to I2C (SDA, SCL pins)
#define OLED_RESET 4 // Reset pin # (or -1 if sharing Arduino reset pin)
Adafruit_SSD1306 display(SCREEN_WIDTH, SCREEN_HEIGHT, &Wire, OLED_RESET);
#define NUMFLAKES 10 // Number of snowflakes in the animation example
#define LOGO_HEIGHT 16
#define LOGO_WIDTH 16
static const unsigned char PROGMEM logo_bmp[] =
{ B00000000, B11000000,
B00000001, B11000000,
B00000001, B11000000,
B00000011, B11100000,
B11110011, B11100000,
B11111110, B11111000,
B01111110, B11111111,
B00110011, B10011111,
B00011111, B11111100,
B00001101, B01110000,
B00011011, B10100000,
B00111111, B11100000,
B00111111, B11110000,
B01111100, B11110000,
B01110000, B01110000,
B00000000, B00110000 };
void setup() {
Serial.begin(9600);
// SSD1306_SWITCHCAPVCC = generate display voltage from 3.3V internally
if(!display.begin(SSD1306_SWITCHCAPVCC, 0x3D)) { // Address 0x3D for 128x64
Serial.println(F("SSD1306 allocation failed"));
for(;;); // Don't proceed, loop forever
}
// Show initial display buffer contents on the screen --
// the library initializes this with an Adafruit splash screen.
display.display();
delay(2000); // Pause for 2 seconds
// Clear the buffer
display.clearDisplay();
// Draw a single pixel in white
display.drawPixel(10, 10, WHITE);
// Show the display buffer on the screen. You MUST call display() after
// drawing commands to make them visible on screen!
display.display();
delay(2000);
// display.display() is NOT necessary after every single drawing command,
// unless that's what you want...rather, you can batch up a bunch of
// drawing operations and then update the screen all at once by calling
// display.display(). These examples demonstrate both approaches...
testdrawline(); // Draw many lines
testdrawrect(); // Draw rectangles (outlines)
testfillrect(); // Draw rectangles (filled)
testdrawcircle(); // Draw circles (outlines)
testfillcircle(); // Draw circles (filled)
testdrawroundrect(); // Draw rounded rectangles (outlines)
testfillroundrect(); // Draw rounded rectangles (filled)
testdrawtriangle(); // Draw triangles (outlines)
testfilltriangle(); // Draw triangles (filled)
testdrawchar(); // Draw characters of the default font
testdrawstyles(); // Draw 'stylized' characters
testscrolltext(); // Draw scrolling text
testdrawbitmap(); // Draw a small bitmap image
// Invert and restore display, pausing in-between
display.invertDisplay(true);
delay(1000);
display.invertDisplay(false);
delay(1000);
testanimate(logo_bmp, LOGO_WIDTH, LOGO_HEIGHT); // Animate bitmaps
}
void loop() {
}
void testdrawline() {
int16_t i;
display.clearDisplay(); // Clear display buffer
for(i=0; i=0; i-=4) {
display.drawLine(display.width()-1, display.height()-1, 0, i, WHITE);
display.display();
delay(1);
}
delay(250);
display.clearDisplay();
for(i=0; i |


